Water coolers have gained their popularity for a reason. They are conveniently used for drinking water by filtration. They are widely used both in offices and stores, and at home.
 However, water has a number of drawbacks: it has the property of settling during long-term storage, and also to form scale during boiling. If you ignore this and do not periodically clean the device, it will soon become unusable. A cooler can fail for a number of reasons.Do not immediately get rid of the device, in most cases it can be repaired both with the help of the services of a wizard, or independently if you have certain skills.
That for preventive cleaning, that for the necessary repair of the cooler it will need to be disassembled. Do not know how to disassemble a water cooler?It is not difficult to do this, however, it is necessary to adhere to a certain algorithm, so that after reassembly the device continues its initial operation.
Algorithm - how to independently disassemble a water cooler
Disassemble the device is not difficult. The main thing is to clearly follow the established sequence of actions and not scatter parts, but carefully lay them out side by side so that subsequently there are no problems during assembly.
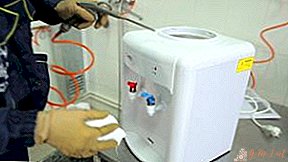
Since the cooler is a household electric appliance, first of all, before disassembling it, you need to make sure that it is disconnected from the network.
IMPORTANT. Disassembling a live device at home is strictly prohibited.
Any analysis begins with the removal of the top cover. To do this, remove the screws with a curly screwdriver. It’s unlikely that you will need to completely disassemble the cooler, so first diagnose the reason why you need to do this, and after that, get down to business in accordance with the algorithm. Typically, the analysis has to be carried out with the following malfunctions or prevention:
 Descaling. To do this, all your attention should be directed towards the tank for heating water, which is usually located in the upper part of the device. First, drain plugs are removed (depending on the model, their number varies from one to two) and the remaining water is drained. The key number 15 removes the rubber seal, and four screws are loosened from under it with a small curly screwdriver. Then the power and ground wires are removed, and then the temperature sensor. Further, you can already dismantle the tank for heating water. For the purpose of prevention, the presence of thermal paste is checked, in its absence it is applied in a thin layer. Often the tank for heating water is wrapped in fiberglass for insulation purposes - it must be removed for further work. After that, we remove the lid itself from the container (in this case, it may be necessary to bite off the retaining clips).
- Check or repair of the heating element. Outwardly, it is a metal spiral. It is located inside the tank for heating water, so it can be checked along the way during preventive descaling. To begin with, it is removed and subjected to visual inspection for microcracks. In their absence, the multimeter checks the operating resistance of the heater with the passport data.
 Descaling. To do this, all your attention should be directed towards the tank for heating water, which is usually located in the upper part of the device. First, drain plugs are removed (depending on the model, their number varies from one to two) and the remaining water is drained. The key number 15 removes the rubber seal, and four screws are loosened from under it with a small curly screwdriver. Then the power and ground wires are removed, and then the temperature sensor. Further, you can already dismantle the tank for heating water. For the purpose of prevention, the presence of thermal paste is checked, in its absence it is applied in a thin layer. Often the tank for heating water is wrapped in fiberglass for insulation purposes - it must be removed for further work. After that, we remove the lid itself from the container (in this case, it may be necessary to bite off the retaining clips).
If there are no deviations, or if the cleaning is successful, then the cooler is assembled in the reverse order.
Is it possible to disassemble the cooler yourself or is it better to call a specialist
 With proper use in normal mode, it is almost impossible to break the cooler.The reasons for its breakdown usually lie in the absence of preventive cleaning. And if most users still clean the device from scale, then not everyone usually gets to the dust. It is necessary to clean the cooler from it both outside and inside. You can carry out these works both independently and with the help of a wizard. The latter is usually resorted to when the cooler is not used at home. However, if you have never resorted to such a thing, and indeed, rarely communicate even with a screwdriver, then the best option would be to abandon the idea of disassembling the cooler yourself.Calling the wizard will cost much less than a complete replacement of the device or the correction of your mistakes.
IMPORTANT. Although there is no prohibition in the legislative framework on disassembling a cooler with your own hands, it should be borne in mind that if a breakdown is detected that you yourself cannot fix, the company may refuse to make warranty repairs if it detects your intervention, even if it was not the cause of the malfunction.
Safety measures for cooler analysis
Before proceeding with the analysis of the cooler, make sure that it is disconnected from the mains.A minute of your time can cost you not only health but also life.
Also, when disassembling the device, it is necessary to pay attention that all water is drained from it: from the tank with the help of taps and drain holes, as well as from the taps themselves.

The cooler must be cleaned of limescale by hand. It is forbidden to resort to the following options for washing it:
- steam cleaners;
- Dishwasher;
- coarse abrasive products.
A better option would be to boil it with citric acid, and then brush it with a toothbrush or a special brush.
If during the cleaning process individual elements of the cooler were wetted, then they must be dried before assembly.
Leave Your Comment